
Friday, November 13, 2009
Somewhat Fixed
There was a super-duper hack that happened about a year ago that I've been meaning to fix and just got around to fixing way late tonight, after my day job finally set me free. But at least it's fixed. Well, it's still a little temporary, but way less temporary than it was. It might look like a goofy solution in this post, but maybe it will make more sense in a day or two. Or maybe not.
Wednesday, November 11, 2009
There. I Feel Better Now.
Hope you do too, seeing as how you caused this whole mess. I'm letting go . . . water under the bridge. Last time I bring it up.

So that was my light-hearted smoke-screen on 11/11, but now I gotta get all serious on you guys for just a minute, cause it's Veteran's Day. Holy krap, we take so much for granted, even though we try not to. We have such great lives because we have such great freedoms. It's just overwhelming to even try to fathom the sacrifices that have been and continue to be made. So I will just try to make it manageable by saying THANK YOU to everyone who has served/does serve in our highly necessary military machine. Getting nuked would be the worst thing ever.
And then, on a way personal level:
Thanks Dad, for fighting in WWII. The stories that we can even get out of you are so horrific.
Thanks, FIL Jack. Yours are equally surreal.
Thanks, brother Dan, for going to Vietnam, even though I'm sure you wanted to throw up over what our government was doing. Your stories are the same kind of unbeleivable.
Thank you, BIL Art, for your all your years of service despite our gov's lack of respect for Native Americans. Glad you have recently re-connected with some of your comrades. Those must be some serious human bonds.
Thank you, Marine nephew James, for your service in Iraq. So glad you are stationed in Japan now. Your uncle is proud and humbled beyond words.
Thank you, Army nephew Travis, for your service in Afghanistan. So glad you are stationed in Hawaii now. Your uncle is proud and humbled beyond words.
Oy, can't see the screen, gotta quit. Sorry for anyone I forgot. Super huge thanks guys and gals.
Tuesday, November 10, 2009
An Elegant Response
Getting your bike stolen sucks. Not just kinda. It's the suckiest type of suck-ness. It makes you question the worth of humanity and make you feel sorry for yourself in the most extreme way and can cause your tongue to lash out in the most violent and inappropriate fashion. If you've been there, you know what I'm talking about.
So, there was this ad on craigslist today that just immediately made an impression and has stuck with me all day:
http://spokane.craigslist.org/bik/1460132683.html
Since the link will soon die, here's the text:
My stolen Huffy (plasma center on 3rd)
--------------------------------------------------------------------------------
Date: 2009-11-10, 1:28PM PST
Reply to: sale-2t2wr-1460132683@craigslist.org [Errors when replying to ads?]
--------------------------------------------------------------------------------
This is to whoever stole my bike outside of the plasma center on 3rd: I hope you fall, hard, and I hope you have a terrible life, it's what you deserve. To anyone looking to purchase of crappy old huffy 'backwater' mountain bike, it is probably my stolen bike.
I love this response on a bunch of different levels. First, the grammar. There's capital letters and punctuation. Yeah, I'm a sucker for people who write good.
Then there's the whole plasma center deal, which I have no doubt is legit and pisses me off that some douche would cop a bike from someone while they're in the middle of getting their blood screwed with because they have to, out of necessity. Lamer than lame.
But what I really love is this person's adjustment to reality. There is no overbearing vitriol as in "if I ever find you, I'm gonna rip your face off", or anything like that. There's no whining and hoping that someone will feel sorry. There's just an acceptance of the fact, and something that must be said in order to get it out of your system and move on with your life:
"I hope you fall, hard, and I hope you have a terrible life..."
Dude, you rock. Truly sorry about your bike, that sucks huge.
Friday, November 6, 2009
Imbalance
Don't get all proud of your cognitive skills. It's not like you're the first person to notice I'm all whacked on racks. It's pretty much common knowledge. In fact, maybe I was the first to know, but it's not like I can do anything about it. I've watched a buncha my buddies burst into flames, smelled that horrid smell, but still, I'm flying as fast as I can towards the irresistable blue glow of that zapper.
So I dropped rack #1 off at the powder coaters today. That was supposed to be the end of that wild episode, a break in the action, a chance to return to a somewhat normal life, if just for one night. But then Patty called me and told me she was going to a play with some friends tonight. What to do. Oh yeah, get normal. But I think it'll be ok if I just peek into the shop and make sure everything is where I left it.
I've been thinking a lot about fixturing. I didn't really have to do much on rack #1, but if you're gonna do racks or frames or anything to do with brazing at all, you're gonna have to fix shit in place. Unless you can learn to hold the brazing rod with your teeth, because that would free up a hand to hold things in place. Don't think I haven't thought about it.
But the idea for tonight was that I maybe I could use the same tubing that I'm building racks out of as struts to hold things in place during fab. All I need is something to clamp them together. Sounds simple enough, but if you've ever tried to clamp two round things together you know that in 90 seconds or less, you will be relying on someone close to you to talk you off the ledge. So I've been trying to wrap my head around a solution for a few days and then tonight I picked up some hardware on the way home from work and then beer and exhaustion made it all come together. I don't know if it's a success, but it's a start.
Here's some 1/4" x 1-1/2 flat bar, imprecisely cut, to put it mildly.
.JPG)
.JPG)
That's a stock $1.99 c-clamp on the left and a modified one on the right.
.JPG)
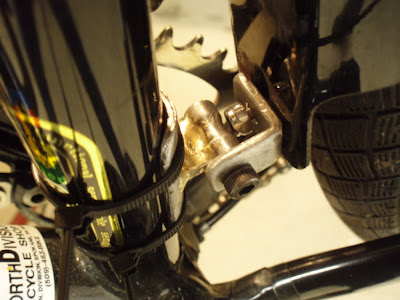
In this picture, we're getting ready to braze the piss out of things. Can you feel the power? The piece of wood is to keep the heat from conducting away from where we need it to stay. I wouldn't wanna be that piece of wood.
.JPG)
.JPG)
Here we are, you and I, doing important round filing.
.JPG)
I can sense that you are as excited as I am about what we've created.
.JPG)
Here I am, slapping my forehead and there you sit, just grinning. It's extremely difficult to find good help.
.JPG)
Don't you get it? The one piece of tubing can't get past the c-clamp. We should have filed the groove in the jaw diagonally. I brought you on board to save me from just this kind of mistake. Criminea. I've never been so exasperated.
.JPG)
All that aside, I think we have a winner of an idea. We'll have to make some new ones, but these will still be useful. You're off the hook, but just barely. Get ready to do some more filing and will you please visualize yourself focusing in, for a change.
.JPG)
So I dropped rack #1 off at the powder coaters today. That was supposed to be the end of that wild episode, a break in the action, a chance to return to a somewhat normal life, if just for one night. But then Patty called me and told me she was going to a play with some friends tonight. What to do. Oh yeah, get normal. But I think it'll be ok if I just peek into the shop and make sure everything is where I left it.
I've been thinking a lot about fixturing. I didn't really have to do much on rack #1, but if you're gonna do racks or frames or anything to do with brazing at all, you're gonna have to fix shit in place. Unless you can learn to hold the brazing rod with your teeth, because that would free up a hand to hold things in place. Don't think I haven't thought about it.
But the idea for tonight was that I maybe I could use the same tubing that I'm building racks out of as struts to hold things in place during fab. All I need is something to clamp them together. Sounds simple enough, but if you've ever tried to clamp two round things together you know that in 90 seconds or less, you will be relying on someone close to you to talk you off the ledge. So I've been trying to wrap my head around a solution for a few days and then tonight I picked up some hardware on the way home from work and then beer and exhaustion made it all come together. I don't know if it's a success, but it's a start.
Here's some 1/4" x 1-1/2 flat bar, imprecisely cut, to put it mildly.
.JPG)
.JPG)
That's a stock $1.99 c-clamp on the left and a modified one on the right.
.JPG)
In this picture, we're getting ready to braze the piss out of things. Can you feel the power? The piece of wood is to keep the heat from conducting away from where we need it to stay. I wouldn't wanna be that piece of wood.
.JPG)
.JPG)
Here we are, you and I, doing important round filing.
.JPG)
I can sense that you are as excited as I am about what we've created.
.JPG)
Here I am, slapping my forehead and there you sit, just grinning. It's extremely difficult to find good help.
.JPG)
Don't you get it? The one piece of tubing can't get past the c-clamp. We should have filed the groove in the jaw diagonally. I brought you on board to save me from just this kind of mistake. Criminea. I've never been so exasperated.
.JPG)
All that aside, I think we have a winner of an idea. We'll have to make some new ones, but these will still be useful. You're off the hook, but just barely. Get ready to do some more filing and will you please visualize yourself focusing in, for a change.
.JPG)
Coming Up For Air
I've become anti-social and downright surly. I've forgotten what sleep is. My co-workers have become accustomed to the pre-occupied zombie in the next cube. My wife just rolls her eyes when I tell her that I'm gonna head out to the shop for just a few minutes and then call it an early night. My own dog barks at me, for crying out loud.
But whatever, I'm finished:

But whatever, I'm finished:

Saturday, October 31, 2009
Rackufacture: Karate Monkey Rear Rack, Part 1
This is gonna be a really long post. Pretty dry, too. If you're not too into the rack building thing, this would be a good one to skip. There, you've been warned.
My first project is finally underway - it's a rear rack for the Karate Monkey. It's a pretty challenging design for a first attempt and as a result, I've been having trouble making any progress. I think I've been a little overwhelmed - it's all new ground and you think something is gonna work one way and then it doesn't, or some way you had planned to do something takes way too long and you have to figure out something different. And then there are the mistakes. Anyway, it's been really slow and with only a coupla hours at a time I've not been able to get in a groove and I've been getting frustrated and pissy. What I needed was a good solid chunk of time to lock myself in that shop and really focus in on what I was doing and get some shit figured out.
So I pleaded my case to Patty last night and she agreed to let me go on an OCD bender. I walked into the shop at eight o'clock last night and walked out 8 hours later majorly wiped but feeling like I'd finally got over the hump and had this project out of park and into drive.
I picked this as my first rack because it's what I need right now. I want my Karate Monkey to be my primary winter bike, but I need a better way to carry things. I got these new waterproof bags a coupla months ago and I've been hanging them off of this rack that clamps to the seatpost. It's the best solution I was able to find in the way of off-the-shelf racks . . . more traditional styles don't work well because they hinder access to the rear disc, which I need if I have a rear flat. I have no complaints about the construction of this rack, as it is rock-solid, but it places the center of gravity of your load so high that it really goofs up the handling of the bike.
.JPG)
My plan is to build a rack that drops that COG way down. (This drawing shows the top hoop only, which will support the panniers. There will be some struts that run down to the dropout, but I'm still working on how I want to do these.) Click the drawing, or any of the pictures for that matter, for a bigger view.
.JPG)
One thing that happens when you drop the bags down is that they move closer to the arc created by your heel as you revolve the cranks. So you have to move the load farther back to provide clearance, which is not all that desirable. I've tried to balance those two things with this design.
.JPG)
.JPG)
Since I'll be using my Lake boots for a good part of the winter and they're my largest shoes, I used them to establish the arc. I measured from the center of the crank and used 15" as my heel travel radius.
.JPG)
I ordered a coupla piceces of foot-square 4130 sheet - one .09" thick and the other .125". My first job was to make some tabs for bolting the rack to the frame.
.JPG)
The tab in the center of the picture below is my first attempt. You wouldn't believe how much time is wrapped up in this little dude. I used the .09" material and it just looked too thin and geometry sucks and it just made me generally unhappy. I'm not a perfectionist, but I do need at least decent work from myself and I knew I was in for a do-over. The other tabs shown in this picture are waterjet-cut tabs that I purchased from Alex. They're gonna be the bomb. But I'm convinced that making tabs is an essential part of my rack-building education, so I need to do it the hard way the first few times.
.JPG)
I decided to get a little more serious this next time around. I scribed the layout on the sheet and then cut them out of the sheet with a hacksaw. Heh, nice straight cut.
.JPG)
Then I clamped them into a set of vise grips and roughed them out on my bench grinder.
.JPG)
.JPG)
Next, I took them down close to their final shape using files. Lots of filing, lots of paying attention. I left just a little extra meat on them for final cleanup.
.JPG)
Finally, I cut them out of the "dogbone". The dogbone idea turned out to be extremely helpful, just because they are so small and the size of the combined tabs was much easier to lay out, handle and clamp in the vise.
.JPG)
The rack design is intended to take advantage of the cantilever brake bosses on the frame, which are not being used, since I'm running discs. My original plan was to make the top hoop in one piece. I would make the u-bend first and then the tighter-radius bends at the ends that attach to the bosses. But I scrapped the whole thing when I crimped those bends. Except that after sleeping on it, I decided to save the "u" and splice some bent ends onto it. This decision was made easier by the fact that would need another full (4') length of tubing to start over and I didn't have any more left. The whole crimped bend thing actually turned out to be a blessing in disguise, as you will see below. This is the u-bend just before I crimped the ends.
.JPG)
I cut a coupla short lenghts of tubing for the ends and set about to cut notches in them to accept the tabs. I've already refined my method for doing this quite a bit and probably have a ways to go, but here's where I'm at right now. First I measure and mark the depth of the cut on both sides of the tube. Then I mark a vertical cut line on both sides.
.JPG)
By angling the hacksaw blade, you can cut one side at a time, which makes it much easier to make the cut on line.
.JPG)
Then I use a cutoff wheel just slightly thinner than the tab to widen the slot.
.JPG)
I take it to its final width and square the bottom edge with a file.
.JPG)
One final step is to file a bevel on each side of the tube and then it is ready to accept the tab. I copied this tab style from Alex. Maybe at some point, I will try some different styles/designs, but for starters, I think it's smart to use something proven. Plenty challenging for a newb.
.JPG)
Here it is brazed up and finished off.
.JPG)
After making sure I would have enough bender clearance, I decided to bend the tubes after installing the tabs. The bend angle is trial and error and I used a layout to check the angle.
.JPG)
I needed a dowel pin to hold the join the bent ends to the U. I'm using 3/8" x .035" tubing, and 5/16" tubing won't fit inside. So I cut a 3" long piece of the 5/16" and cut a slot down the length. Then I cut it in half and squeezed the diameter of each piece down in the vise so they would fit inside the 3/8". Another stolen idea, this time from Alistair.
.JPG)
.JPG)
Here are the ends being fit into the U. This arrangement lets me fine tune the angle of the ends and would not have been possible had I not ended up making the top loop in sections.
.JPG)
The canti bosses have 10 mm female thread. The canti post threads into the boss and has a 6 mm internal thread. I was able to cut the pivot tube off of the post and file the end flat.
.JPG)
Here is is being threaded into the boss. This is what the rack tab will bear on.
.JPG)
Here it is, bolted up and fit into place, which left me very tired and very happy. The end of the U extends farther past the fender than I like, so I will trim the legs to bring it in. This is another thing that would never have been possible if I hadn't crimped those bends. Guess that turned out to be a pretty good thing.
.JPG)
I've used up so much 3/8" tubing on test pieces and mistakes that I don't have enough left to finish this rack. Another order is on the way and should be here early next week. Can't wait to get my hands on it.
.JPG)
Thursday, October 29, 2009
Rackufacture: Hand Bender Do's and Don'ts
Education ain't cheap. Just ask any college student. I paid my dues tonight.
I've been making good progress on a rack for my Karate Monkey and was excited to get home tonight and make a little more. I knew exactly what my plan was: Take the u-bend from last night, clamp it to the bench, engage the bender and then "roll" it 13 degrees to get the bend in the right plane. The setup went just fine.

But when I went to bend it, halfway through the bend, I felt the pressure on the handle give, which is a sick feeling and means your bend has crimped. F@#K. That was a whole 4' length of tube that just went into the toilet.
Since it was already trashed, I decided to bend the other leg and that one crimped too! DOUBLE F@#K!!! And more importantly WTF! These benders do a great job and I couldn't figure out what the hell had just happened. Here's the difference between a normal and crimped bend.

I ended up making a buncha bends and burning a buncha tubing to get this figured out, but it was worth it. The deal is that, in order for these benders to do a good job, the "shoe" has to keep the tubing in tension as it pulls the tubing around the die. I thought I was doing that in the arrangement above, but the body mechanics required to do that bend make it extremely difficult to maintain tension. And if you don't maintain tension, the tube separates from the sidewall of the die and bad things happen.
I just noticed that your eyes glazed over. Sorry. And that was a sucky explanation, I know.
Condensed down, don't bend anything the way I tried to unless you want to throw it in the garbage. Clamp your bender in a vice and do it that way instead. Money.
And speaking of money, here's how I spent mine tonight.

But wait. Yeah, I hear ya. There's some interesting shapes in that pile. Hmmm.
Subscribe to:
Posts (Atom)