And yeah, I can park it in a pannier, but then it's hard to get to. Holy hell, what if my phone rings?
So I've been cooking up a plan to stash my essentials on the front of my bike.
Handlebar bags ain't easy to find . . . I think they make all kinds of sense, but they're just not in fashion right now. I checked out damned near every LBS in greater Spo, to no avail. Mostly, they tried to tell me that what I wanted was some type of rear bag. Which I did not.
And then I scored, at REI. I know, they're corporate and all, but just because of that, they bring some bike products here that we wouldn't otherwise get. Spo can be a little introverted and REI helps with that, so I'm happy so spend a portion of my bike dollars there.
Now. This is where I need to pause. Because I am anticipating that you might be thinking the HANDLEBAR BAG that I bought may possibly resemble a Man Purse.
Not that I have anything against Man Purses or anyone who carries one. But it's just not my thing. Matterafact, I'm not too crazy about saying the words. So let's just make it vividly, crytalline clear that this is Not A Man Purse.
Anyway, we're good on that, right? Okayfine. Let's move forward.

This particular N.A.M.P. is made by Tibuk2, the guys that make all the courier bags. It's got a waterproof lining, which rules.

Trouble is, the mounting blows.
Damn, guess I'll have to build a custom rack.

First, though, there's a M.P.-ish feature to this bag that I need to deal with: Built-in, hideaway, fanny-pack straps. Sorry, not havin' those on my N.A.M.P.


Anyhoo. On to the actual rack. This is the the layout on the first piece of tubing. (You can click any of these pics to supersize.)

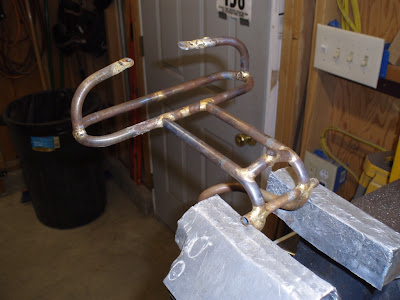
Same tube, only pretzeled . . .

Coupla more pieces. I've found it really helpful to print out a coupla sketches to scale so I can check the layout . . .

So I've been having a bear of a time figuring out how to fill in vent holes. You need vent holes so that the air inside a tube can escape as you're sealing up the final joint.
Problem is, you eventually have to plug the vent hole and when you're heating up a tube, the air inside is expanding out the hole at the same time you're trying to get liquid brass to go in. I've poured a lotta brass all over the place and spent a lot more time filing it into dust.
So I posed the question to the Framebuilders list, which is a rad bunch of hardcore builders who live for this kind of shit. I'm a super-dork on the list, but still got a boat-load of great responses and suggestions, including some from PNW builders Alistair, Alex, and Chris Boedeker.
One of the great suggestions was to use "blind" vent holes. That is, holes that vent into other tubes and are hidden, so you don't have to fill them. Why didn't I think of that. I used the concept extensively on this rack.

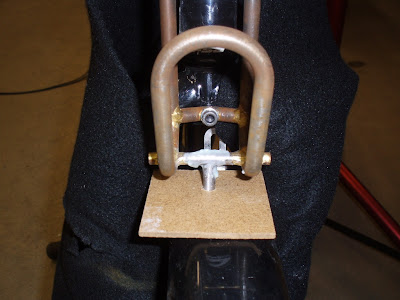
I wanted to clamp the rack to the steerer tube, so I needed to make a clamp . . .


Here's the rack, getting fit up with high-dollar zip-tie and scrap wood fixturing . . .


Getting close . . .

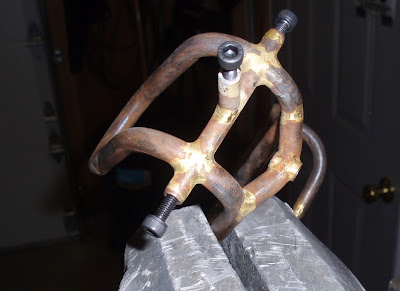
I brazed a coupla these eyelets onto some tube ends . . .

The one coming out the bottom is to attach the front fender and the two coming out the side are attachment points for a (future) porteur deck.

Alistair's tip on plugging vent holes made a lot of sense. Unfortunately, I haven't done any silver brazing, but I've never let a lack of experience or knowledge stop me. I know just barely enough to know that frame builders wouldn't use this stuff, but it's what was available at my local welding supply house and since these joints aren't structural at all, it should do just fine.


Here's what a vent hole looks like after it's filled, filed and sanded. Cool.

'Bout ready to stick it on the bike. Thought I'd see how much weight I was adding . . .

Rock 'n roll . . .


I already love my N.A.M.P. and I haven't even used it.

If I was into M.P.'s, this is exactly what I'd want mine to look like.

8 comments:
I think with all the metal you're adding to your bike in the form of front, back, side, overhead (?) carriers, you'll soon be on the same playing field as a mini van, or at least a Buick...
You're all set for the outback with your roo bars, mate.
I was wondering how I was ever going to attach my BMX number plate. Question answered. Kidding aside, it looks great.
You are one crazy rack-makin' mofo! I love reading your rackufacturing posts. How long did this rack take from design to finished product?(I had to take two breaks while rading the post)
Wade
Wade, I haven't kept track of hours on any of these projects, I think I don't want to know. It's a bunch. Hopefully I'll get faster with practice.
I have never seen a handlebar bag that was "easy" to mount and remove, so there truly was a need for your rack.
Nice job Pat. I'm most impressed with the clamp and the fact that you made it with hand tools. That is a fine looking piece of aluminum.
TBCC -- Ortlieb hooks under the bag and a back strap make a handlebar bag that comes on and off as easily as a pannier:
http://alexandchristine.smugmug.com/Bicycles/Racks/Curvy-Handlebar-Bag-Rack/6871929_gh4sR#447255745_qqS9p
Alex, I love the clean simplicity of your rack. This one of mine tries to do a lot of things and got a little more complicated than I would like. I think smaller diameter tubing would have helped, but 3/8" was what I had on hand. I'm really having fun with the process of learning what I like and don't like about every rack that I build.
Post a Comment