Sunday, February 28, 2010

Bring On The Night

I'm historically a "how-many-mega-watts?" battery-powered light guy, but I've been playin' with a dyno hub and front light for the past year or so. (I think I did a post on it at some point but I'll be damned if I can find it.) These are cool because you power your light with your pedals and you don't need any blasted batteries. If you got game, they got game. The whole deal has been pretty cool except that this year I've done a bunch of riding in the dark and I find that I just don't have enough light to keep me happy.

The light I've been using is a halogen. Halogen's been kind of the gold standard for a number years, from what I've read, so that's why I bought it. But maybe one of the biggest bike technology revolutions in the last several years, and showing no signs of letting up, is LED lighting. So I put my ear to the ground and word on the street is that the Busch&Müller Lumotec IQ Cyo is the hot ticket.

Unfortunately, their marketing guy was out sick on the day they decided what to call all the different versions of this light and the engineering guys took over. Holy hell . . .

Lumotec IQ Cyo N Plus Black
Lumotec IQ Cyo Senso Plus Black
Lumotec IQ Cyo Senso Plus Chrome Plated
Lumotec IQ Cyo R N Plus Black
Lumotec IQ Cyo R Senso Plus Black
Lumotec IQ Cyo R Senso Plus Chrome Plate

I'm pretty sure that's not even the complete list. I hope the engineering guys know slightly more about how to light up the road than they do about selling shit.

I turned to Peter White to help me sort this mess out. Yeah, he's cranky, but he puts massive info on his website and his friendly assistants mainly take the calls so you don't have to talk to him! I always like to order from him 'cause he's helped me figure a lotta things out. His service has always been top-notch, to boot.

So here's the new light. It comes with a very high-quality stainless steel mounting bracket that is too convenient . . .


. . . so I decided that I would have to make thinks more difficult and figure out a different way to mount it. My N.A.M.P. front rack had barely cooled off, but apparently it was time to hack a mount onto it . . .


Naturally, the wires were too short, so I scabbed some extensions on. I don't like crimp connectors, so I soldered the bastards.


Here we are with the bare rack . . .


. . . and here's how it looks with the N.A.M.P. Jeez, I'm with you. The whole look is freakin' weird. I just hope it grows on me . . .


The back of the light has a rotary switch that let's you select from On, Off, or Auto (senses low light and turns on automatically) modes.


I asked my myself how you would want me to test this light and I had no doubt that you would want me to take it on a beer run. I rolled into the Conoco at 29th and Grand after dark, on a bike, wearing a dirty baseball cap and grubby shop clothes. I've been sick and dehydrated, so my face had that sunken look and I hadn't shaved in 3 or 4 days. Not sure why the cashier didn't make direct eye contact, but whatever, a 6-pack was soon stashed in my saddlebag.


Anyway, it was just a short, neighborhood ride, but this light appears to RULE. I will have a chance to full-on test it out this week.

Thursday, February 25, 2010

Barely Surviving

I'm on the road again and it's hell. Always having to get by with makeshift krap. Don't believe me? Check this out . . .

My damn mouse wouldn't work on the glass tabletop. I had to search and search and search my hotel room for something with the proper texture to simulate a mouse pad. Finally I came up with the back cover of a magazine (I tried and tried and tried to use the front cover, but things just weren't "clicking").


I'm not saying that all my troubles are in the past, but my mouse does seem super responsive now.

Monday, February 22, 2010

Rackufacture: N.A.M.P. Front Rack

When you're utility cycling, you need someplace to throw your krap. There's always pockets, but I hate having shit stab me. Or sitting on my wallet.


And yeah, I can park it in a pannier, but then it's hard to get to. Holy hell, what if my phone rings?

So I've been cooking up a plan to stash my essentials on the front of my bike.

Handlebar bags ain't easy to find . . . I think they make all kinds of sense, but they're just not in fashion right now. I checked out damned near every LBS in greater Spo, to no avail. Mostly, they tried to tell me that what I wanted was some type of rear bag. Which I did not.

And then I scored, at REI. I know, they're corporate and all, but just because of that, they bring some bike products here that we wouldn't otherwise get. Spo can be a little introverted and REI helps with that, so I'm happy so spend a portion of my bike dollars there.

Now. This is where I need to pause. Because I am anticipating that you might be thinking the HANDLEBAR BAG that I bought may possibly resemble a Man Purse.

Not that I have anything against Man Purses or anyone who carries one. But it's just not my thing. Matterafact, I'm not too crazy about saying the words. So let's just make it vividly, crytalline clear that this is Not A Man Purse.

Anyway, we're good on that, right? Okayfine. Let's move forward.


This particular N.A.M.P. is made by Tibuk2, the guys that make all the courier bags. It's got a waterproof lining, which rules.


Trouble is, the mounting blows.

Damn, guess I'll have to build a custom rack.


First, though, there's a M.P.-ish feature to this bag that I need to deal with: Built-in, hideaway, fanny-pack straps. Sorry, not havin' those on my N.A.M.P.


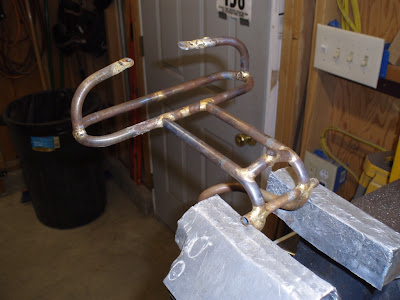
Anyhoo. On to the actual rack. This is the the layout on the first piece of tubing. (You can click any of these pics to supersize.)


Same tube, only pretzeled . . .


Coupla more pieces. I've found it really helpful to print out a coupla sketches to scale so I can check the layout . . .


So I've been having a bear of a time figuring out how to fill in vent holes. You need vent holes so that the air inside a tube can escape as you're sealing up the final joint.

Problem is, you eventually have to plug the vent hole and when you're heating up a tube, the air inside is expanding out the hole at the same time you're trying to get liquid brass to go in. I've poured a lotta brass all over the place and spent a lot more time filing it into dust.

So I posed the question to the Framebuilders list, which is a rad bunch of hardcore builders who live for this kind of shit. I'm a super-dork on the list, but still got a boat-load of great responses and suggestions, including some from PNW builders Alistair, Alex, and Chris Boedeker.

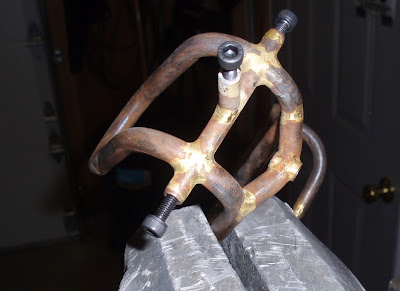
One of the great suggestions was to use "blind" vent holes. That is, holes that vent into other tubes and are hidden, so you don't have to fill them. Why didn't I think of that. I used the concept extensively on this rack.


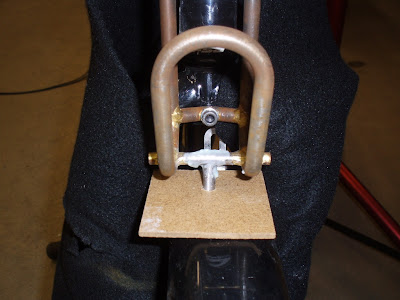
I wanted to clamp the rack to the steerer tube, so I needed to make a clamp . . .


Here's the rack, getting fit up with high-dollar zip-tie and scrap wood fixturing . . .


Getting close . . .


I brazed a coupla these eyelets onto some tube ends . . .


The one coming out the bottom is to attach the front fender and the two coming out the side are attachment points for a (future) porteur deck.


Alistair's tip on plugging vent holes made a lot of sense. Unfortunately, I haven't done any silver brazing, but I've never let a lack of experience or knowledge stop me. I know just barely enough to know that frame builders wouldn't use this stuff, but it's what was available at my local welding supply house and since these joints aren't structural at all, it should do just fine.


Here's what a vent hole looks like after it's filled, filed and sanded. Cool.


'Bout ready to stick it on the bike. Thought I'd see how much weight I was adding . . .


Rock 'n roll . . .


I already love my N.A.M.P. and I haven't even used it.


If I was into M.P.'s, this is exactly what I'd want mine to look like.

Sunday, February 14, 2010

Rackufacture: First Porteur Rack

Wow, like the songs says, what a long strange journey it's been. This project genesized quite a while ago. John did this post and I was not quite yet ready to actually build racks, but way over-the-top hyped about it and I knew immediately that I was gonna build a rack for that bike.

Reason being, well . . . I can't do this in one short sentence. Not really sure I can do in in a hundred long ones, but here's the deal:

Jon is our new city councilman from my district. He was already cool and now he's just slightly cooler with the whole city hall gig. He rides. He's the opposite of a bike nerd - he just throws his leg over and goes. He and his wife have chosen a one-car-lifestyle. So he rides. Everywhere, all year long. Totally flippin cool, most especially for a politician.

Enter major bike nerd John, good friend of Jon, who has an intelligent and informed idea about what kind of bike our good councilman oughta be aboard. I don't know jack about bike geometry, but I am aware that a lotta guys who know what they are doing say that you should be carrying your cargo on a front rack, on a bike that's designed to do just that. Think Frenchmen, delivering newspapers. Here's a great shot of an array of classic front racks. Done right.

And all this appeals to me at the most basic, instinctive level because I love bikes that do jobs and people that use their bikes to do jobs and so I figured that if someone else figured out the geomety, I should be able to figure out a rack. Unfortunately, this rack couldn't be normal. It's main job would be to carry an Ortlieb Office Bag. Complete with freaky mounting hardware.

For quite a while, I was kicking designs around in my head, but nothing was clicking. Then John saw a rack that Alex was helping Mark build or something, and John does this tracing that I can hardly decipher except that it somehow makes sense in some way and I don't even know what, but all of a sudden we have a design and we're off and running.

I didn't have access to the bag, but I had enough clues to get started, so I sketched it out and transferred it to paper. John suggested we transfer it to cardboard. Damn good idea.


Finally got a hold of the actual bag. Ummm, yeah, damn thing's about two inches short. Good thing we did the cardboard mock-up.


Here's the two-inch-longer rack, under construction . . .


Deck complete . . .


That's better . . .


Finally, it was time to pry the bike from Jon's grip so we could fit the rack.

Holy hell. If ever there was a bike that needed some rack love, this would be it:


Crazy bike-slash-carpentry fun . .


So damn proud of my c-clamps. You can pretty much expect that you'll have to look at them every time I do even the most minor clamp job . . .


All fit up . . .


Bag test . . .


The final cleanup took about two hours. That's on top of a lot of rough, preliminary cleanup. I've decided that I really hate this part. It's nasty, tedious work that tears up hour hands and you breathe a lot of nasty dust. I think I'll check and see what the powder coater would charge me to blast it. Probably a bargain at any price. Anyway, by the time I go through all the cleanup, there's no way I'm taking any chances - hermetically sealed until I can drop it off at the finisher's.


Here's the follow up, after painting, mounting and the maiden voyage. Far out. I love knowing that it's gonna be a workhorse.

I've had some people ask me about this rack thing, mainly why. I don't have any kind of a clear answer, but this post comes about as close to explaining it as I'll ever get.